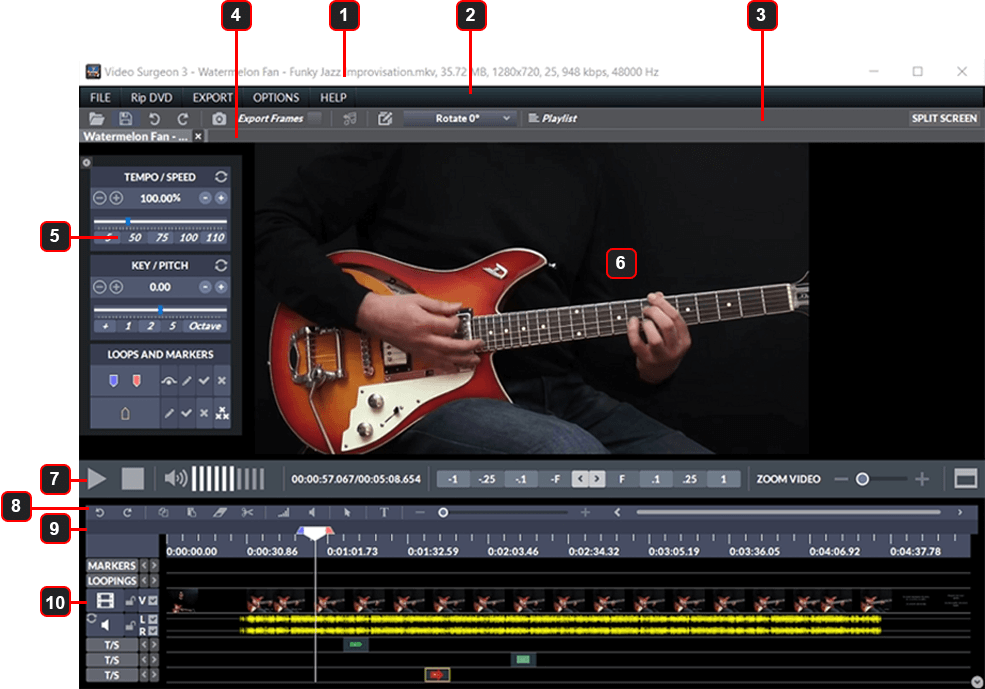
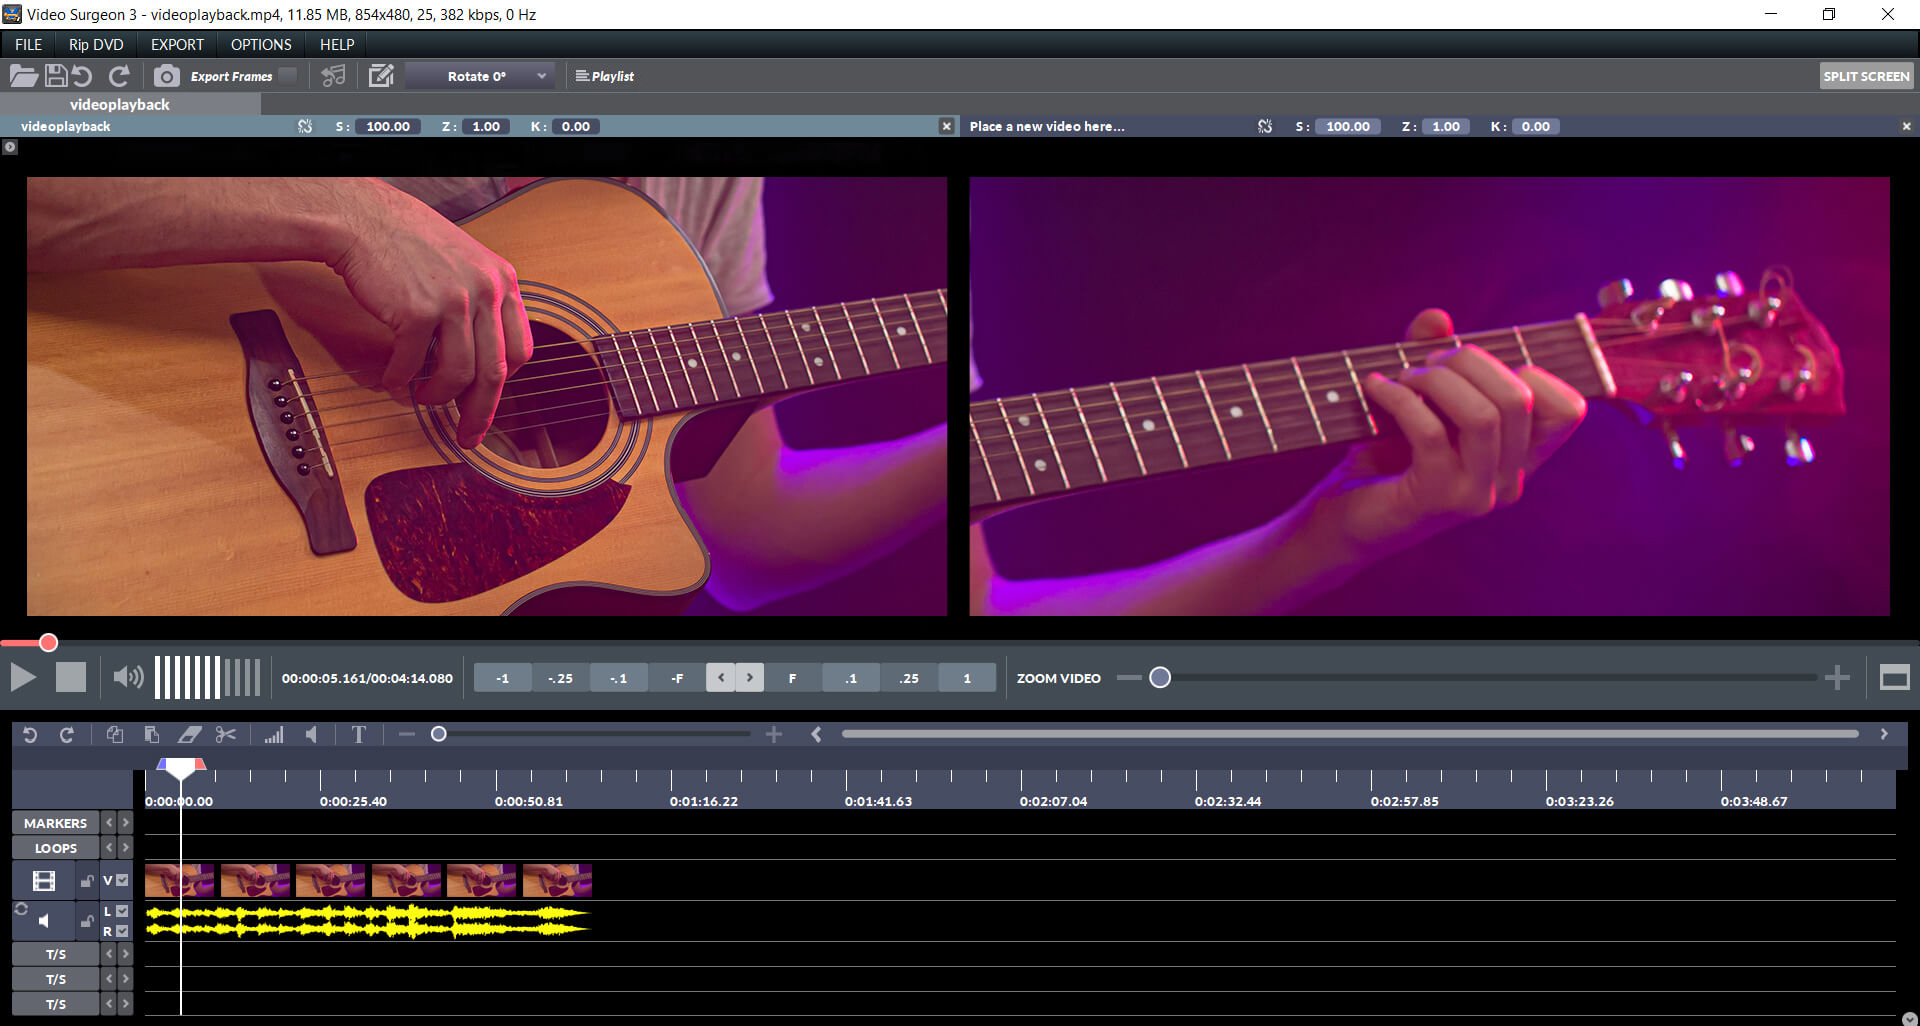
Let’s begin with an overview of the layout of the main user interface, which is shown below.
1
After a video is opened in Video Surgeon (VS3) the Top Frame of the UI will display the video file
characteristics. This includes the file name, the file size (MBs), the video size, the frame rate, video
quality (KBPS) and the audio frequency. You can see these parameters in the image shown above.
2
This area is called the Top Text Menu. It contains five different menu items: File, Rip DVD, Export,
Options, and Help. Each of these buttons and their associated functions will be reviewed in detail
within this UG. Click to go there
3
This section of the UI is referred to as the Top Submenu. This submenu consists of graphic icons and
text. The functions associated with each will be reviewed in that section of the UG. Click
to go there
4
This is the Video Sessions display area. VS3 allows up to five videos to be opened at one time. Clicking
the video name shown here changes the video that appears in the main video screen. When you change or
toggle between videos the video characteristics for that video will appear in the Top Frame of VS3.
Lastly, users can close a video by clicking the X next to the name of each video in this section of the
UI.
5
This menu on the left side is referred to as the TKLM menu (for tempo, key, loop and markers). Each of
these functions are explained in detail in that portion of the UG. Click to go there
6
This area of the UI is termed the main video display area.
7
This is the Video Control Menu. Each of these functions are explained in detail in that
portion of the
UG. Click to go there
8
This is the Video Editing Menu. Each of these functions are explained in detail that
portion of the UG. Click to go there
10
This bottom area of the UI contains the video timeline and associated features and functions. This
section will be explained in detail that portion of the UG. Click to go there
11
Top Text Menu

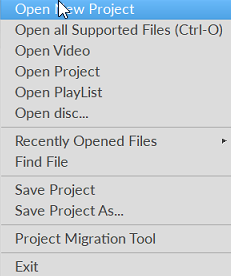
11.1.0. The first item in the Top Text Menu is the File button. Within
this File Menu
there are a number of selections which are described below.
11.1.1. Open New Project
This option clears the program of any/all open videos or projects and returns the program to the state
of being first opened.
11.1.2. Open All Supported Files
The first selection of this File drop down menu is the Open selection. The first option, Open All
Supported
Files, will open a dialog window and allow you to browse. As you browse it will show and allow
you to
select any of the file types supported by Video Surgeon and open them. This includes video
files, VS
project files, VS playlists, and files on a DVD.
11.1.3. Open Video
The second option opens a dialog window that will restrict the files to be opened to only video files.
VS3 opens the following video file formats: mp4, Mkv, mpg, avi, ts, wmv, mov, mts, ,webm, vob, and rm.
11.1.4 Open Project
Option 3 in this drop down will restrict your choices to only Video Surgeon project files. This includes
both vsp and pvj files. A pvj is a special kind of project file that, unlike the standard vsp file,
contains an embedded video as part of the file. As such it can be transferred and opened on any machine
that has VS3 installed on it. Version 3 is backward compatible and can open Version 2 project files.
11.1.5 Open Playlist
Video Surgeon playlist files (vpl) are new to Version 3. This selection restricts your selection to only
playlist files.
11.1.6 Open Disc
The Open Disc selection opens a customized dialog that scans your DVD drive, displays a list of titles
and chapters on the DVD and allows you to open a selection.
11.1.7 Recently Opened Files
The next selection in the drop down menu is the Recently Opened Files menu. Displayed here is a list of
recently opened files that can be easily and quickly selected. In addition, at the very top of the list
from this selection is an
option to manage recently opened files. This dialog allows you to reorder and delete files in the list.
11.1.8 The Find File selection is a search feature that utilizes a
standard dialog window and allows
searching by file name. A partial copy of this dialog window is can be found below. To run a search type
in the text you'd like to search for in the search field on the right side of the image shown here.

11.1.9 Project Files
A project file is a file that contains all of the settings you have applied in VS3 so, when it is
re-opened these are re-applied and your original work appears on the screen. Project files DO NOT
contain video. They contain the path to the video being used. That means that if you move a video or
delete a video used by a project file, that file will not open.
The next two selections are for saving or creating project files. The first, Save Project, assumes you
have a project open or have already saved your work as a project. When you select it, no dialog is
opened. VS3 simply saves the current state of your work using the existing project name you are working
with. The second option, Save Project As, will open a dialog window and allow you to assign a project
name.
11.1.10 Project Migration Tool.
 The Project Migration Tool is a new feature found in VS3. The tool allows users to easily and
conveniently move projects from one machine to another. Remember, standard project files (.vsp) do
NOT contain any video, rather they contain a path to the video location on your machine. When you move a
project file to a new machine, VS3 will look for the video in the path contained in the project file.
Unless the new machine has exactly the same folders and paths containing your video files, it will not
be able to find the video and therefore will not be able to open the project file.
The Project Migration Tool is a new feature found in VS3. The tool allows users to easily and
conveniently move projects from one machine to another. Remember, standard project files (.vsp) do
NOT contain any video, rather they contain a path to the video location on your machine. When you move a
project file to a new machine, VS3 will look for the video in the path contained in the project file.
Unless the new machine has exactly the same folders and paths containing your video files, it will not
be able to find the video and therefore will not be able to open the project file.
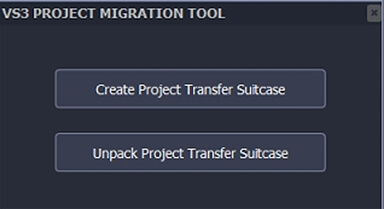
The Project Migration tools helps you migrate your projects and all associated video files to your new
machine. When you select this option the first dialog shown is this. If you are beginning the process to
find, collect, organize and pack the files on your old computer to move it to the new one select, Create
Project Transfer Suitcase.
If you have already done this, and are on your new computer and want to place the files from your old
computer onto your new one, then select Unpack Project Transfer Suitcase and follow the prompts on the
screen.
11.2.0 RipDVD
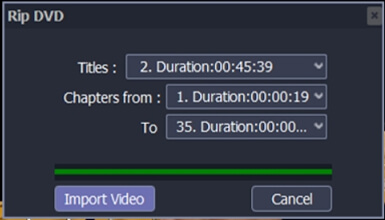 The next item in the Top Text Menu is the RipDVD button. When this button is clicked a dialog window
opens. This window is shown here to the right. If a DVD is already in your CD/DVD drive, VS3 will read
it and return data. Unlike older versions of VS where only .vob files could be selected to rip, VS3
returns and shows the number of Titles on the DVD and then the number of Chapters in each Title and the
duration of each. This allows users to find and rip (import) only a small segment of a DVD rather than
ripping or opening entire .vob files which can be up to 1 Gb in size. Once a selection has been made,
click the Import Video button and VS3 will rip and open this portion of the DVD.
The next item in the Top Text Menu is the RipDVD button. When this button is clicked a dialog window
opens. This window is shown here to the right. If a DVD is already in your CD/DVD drive, VS3 will read
it and return data. Unlike older versions of VS where only .vob files could be selected to rip, VS3
returns and shows the number of Titles on the DVD and then the number of Chapters in each Title and the
duration of each. This allows users to find and rip (import) only a small segment of a DVD rather than
ripping or opening entire .vob files which can be up to 1 Gb in size. Once a selection has been made,
click the Import Video button and VS3 will rip and open this portion of the DVD.
11.3.0 Export
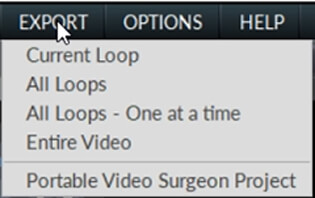 The next text button is the Export Button. Exporting is the function that renders or creates a new
video, using whatever file you have open on the screen and applying whatever changes to it you have made
in VS3. Clicking this shows a submenu with the following selections as shown on the right.
The next text button is the Export Button. Exporting is the function that renders or creates a new
video, using whatever file you have open on the screen and applying whatever changes to it you have made
in VS3. Clicking this shows a submenu with the following selections as shown on the right.
11.3.1 Current Loop
The first selection at the top of this submenu is for exporting the current loop. You must designate the
current loop by placing the progress indicator inside of it. This selects it and tells VS3 that this is
the current loop.
11.3.2 All Loops
This selection will export and create a new video using all loops that have been created in the open
instance of VS3. VS3 creates this video by creating a video starting from the first loop on the left and
moving to subsequent loops to the right. It places the data from these loops, back to back, and applies
any custom settings for each loop to the video being created.
11.3.3 All Loops – One at a time
This is similar to the above except that VS does not create a single video from all of the loops but
creates a separate video for each loop. VS will use the name you assign to the file to be created and
append to that name an additional value, so each file created has its own individual name.
11.3.4 Entire Video
This option exports or renders the entire video file, including the custom values or changes made to
data inside of loops, and creates a new one.
11.3.5 Portable Video Surgeon Project
A portable project file is a combination of a project file + a video file. The biggest difference is
that these files actually contain the video, not just a path to the video. What that means is that these
portable project files can be moved to any machine on which VS3 is installed and these files will be
able to be opened. Because these files contain video they can be quite large whereas project files are
very small.
11.3.6 Export Dialog Window
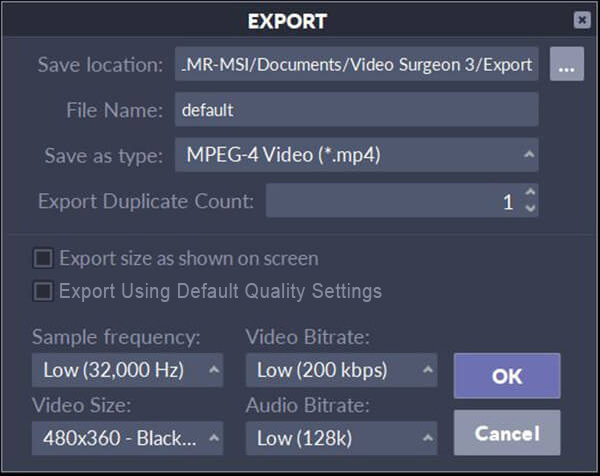 When you choose any of the options in this Export menu, VS3 opens an Export dialog window that is shown
to the right. This dialog window allows you to set and change the settings for the video to be created.
When you choose any of the options in this Export menu, VS3 opens an Export dialog window that is shown
to the right. This dialog window allows you to set and change the settings for the video to be created.
At the top, the save location will be the path set in the Options button. By default it is the Export
folder, but this can be changed.
The second field shown here is the File Name field. Here you can use the name suggested or modify it as
necessary.
Next, is the Save As Type field in which you select the file format to be created on Export. Below this
is the Export Duplicate Count field. This field is set to 1 by default which means it uses
only a single copy of whatever you are exporting to create the new video file. However, any value from 1
to 100 can be inserted here. If the value 5 is inserted, VS3 will make 5 copies of whatever is being
exported and insert them in the file. This feature allows files to be made the play the same segment
repeatedly, thus mimicking the looping function.
The “Export Size As Shown On Screen” checkbox will create the new video exactly as seen on the screen,
with zoom applied, and is selected by default. If unchecked, then Export will create a video with no
zoom applied to it.
VS3 will use the original video quality settings when it Exports, and these will be shown in the fields
at the bottom of this dialog. If you'd like to change these setting you are free to do so.
Alternatively, if you'd like to use the default settings your have chosen in the Options >> Settiings 2
tab, select the checkbox for "Use Default Settings".
Once all of the items in this dialog window are selected and completed, click the OK button will start
the Exporting process and VS3 will render and create a new video.
11.4.0 Options Button
 The Options button contains within it several tabs which allow users to custom the software to best suit
their needs. Each of these tabs and its accompanying options are reviewed below.
The Options button contains within it several tabs which allow users to custom the software to best suit
their needs. Each of these tabs and its accompanying options are reviewed below.
11.4.1 Default Paths
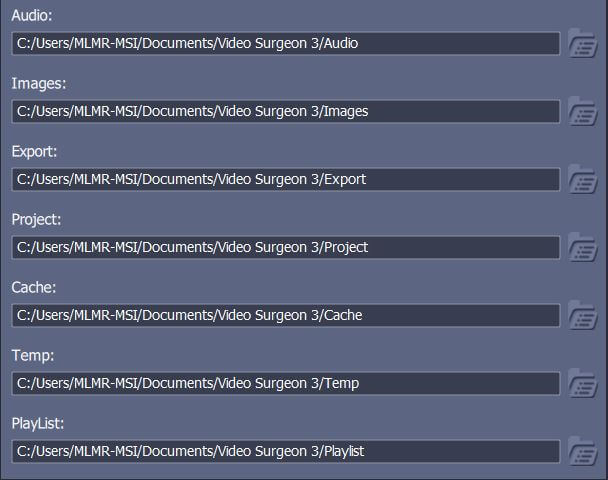 The first tab in the Options button contains the paths that are created by default when VS3 is
installed. These paths are used by the program and are as follows:
The first tab in the Options button contains the paths that are created by default when VS3 is
installed. These paths are used by the program and are as follows:
- Audio is for the storing or saving of audio that is stripped from video files in VS3
- Images is used to store pictures of images extracted from the videos opened in VS3
- Export is the folder used when you execute the export command to render and create a new video.
- Project is where project files that are created are stored.
- Cache
This folder is used by the program and under most circumstances should not be changed.
- The Playlist folder is where any playlists created in VS3 are stored.
- These paths can be changed by clicking on the folder on the far right of each path and then browsing
to and selecting the new location you’d like to use.
11.4.2 Program Settings 1
 This is the first of two Program Settings windows is shown here on the right. Starting at the top and
moving downward the following options are customizable.
This is the first of two Program Settings windows is shown here on the right. Starting at the top and
moving downward the following options are customizable.
Speed/Tempo: These values are expressed as a percentage and are applied to the preset
buttons in the tempo area of the UI
Key: These values are applied to the Key preset values and are expressed in units of a
semi-tone or half step.
Marker Size, Color, and Tail: These control how the markers appear on the timeline
Video Edit: These control the lock/unlock buttons in the bottom timeline area. When
locked a video
cannot be edited.
Audio Edit: These control the lock/unlock buttons in the bottom timeline area. When
locked an audio
cannot be edited.
Export File Type: This controls the default value which appears in the Export Dialog
window
Volume: This controls the default volume for a video which is opened in VS3
Show/Hide: This sections within the dialog window allow you to customize how the left
side menu on Video Surgeon will appear by default in the program when you open it. They allow you to
show or hide individual components or the entire left-side menu.
Automatic Save Period: Video Surgeon has an Automatic Timed Backup. The frequency for
this timed backup can be set here.
After changes are made, the OK button should be clicked. If you don’t see your new values immediately,
close the program and open again and then check.
11.4.3 Program Settings 2
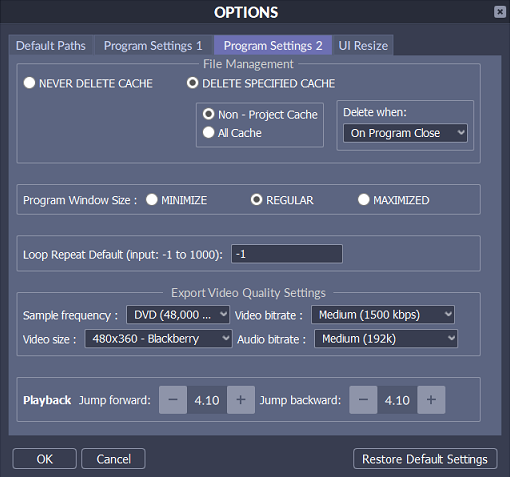 Proceeding from top to bottom, the follow customizations can be made in this screen.
File Management: When a file is opened VS3 must extract the audio to plot it, and also
thumbnails to display them on the screen. These settings allow you to keep or delete this files used by
the program. The default is to delete these on closing for all file EXCEPT project files, which my
definition are re-opened and re-used.
Program Window Size: This allows you to customize the size of the VS3 user interface
upon opening.
Loop Repeat: This allows a customization for how many times a loop plays repeatedly. By
default this is set to -1, which means infinite. Any positive value selected will limit a loop to play
that many times before it stops.
Export Video Quality Settings: At the button are the video quality settings which
appear in the Export Dialog Window. These defaults can be changed here.
User Defined Jump Forward/Backward: Using your keyboard arrow keys, Video Surgeon’s
progress indicator will jump forward or backward with each click. This amount can be customized here in
the bottom section of this dialog window.
After changes are made, the OK button should be clicked. If you don’t see your new values immediately,
close the program and open again and then check.
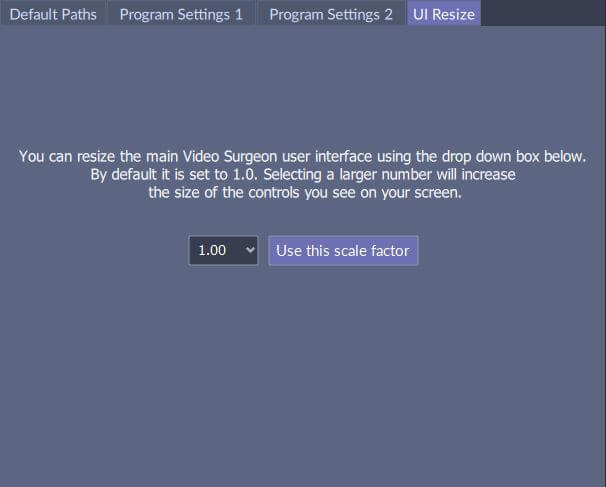
11.4.4 UI Resizing
This final tab on the right allows users to customize the size of the VS3 user interface as it appears
on the screen. The process is simple. Select a value from the drop down box and apply it. Values larger
than 1.0 will make the UI larger. Values smaller will make the UI smaller. The settings available are
calculated for each machine based upon the monitor being used and its resolution.
11.5.0 Help Button
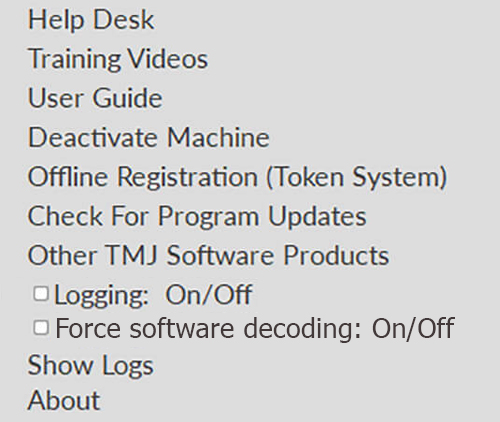
The Help Button found on the right end of the Top Text menu contains a number of selections which are
briefly reviewed below:
- The Help Desk selection will take you directly to our 24/7 Help Desk.
- The Training Video selection is linked to the training videos page on VS site that contains a
series
of video demonstrations of the product
- The User Guide selection in this button is linked directly to this page that you are now reading,
which is the VS User Guide.
- Deactivate Machine is an option that will remove the license from the machine on which VS3 is
installed when you select that option. This is something you should do if you want to install the
VS3 on
a different machine.
- Offline Registration is a method of activating the software used ONLY for machines that cannot be
put
online. This option is only used in conjunction with the Help Desk. If you need to activate a
machine
that is offline, please contact the Help Desk and they will assist you with this issue.
-
Video Surgeon has an auto-updater built into it. Each time you open the program it check for an
available update and if one is available it will notify you. If you decide not to update when
notified but later want to download and install this update, you can use the “Check For Updates”
option in the Help Button. It will tell you if there are any updates to the current version of VS3
you are running.
- Other TMJ Software Products links to a web page that provides a brief overview of other products and
services we provide.
- Logging On/Off is by default turn off. If you have an issue with VS3 our support
staff may ask you to enable this feature. When it is enabled, VS3 will log the operations of the
software and this will help us diagnose potential problems.
- The Show Logs option opens the folder where these logs are stored for easy access.
- Selecting About will show you the current version of the
software installed on your machine. It also displays your machine name or identifier as it is used
in
our system (in your My Account page). It also contains other legal and ownership information.
12
12.0.0 Top Submenu
This section walks through each of the items contained on this submenu and explains what they are and
how they work.

12.1.0 Open Icon: Starting at the far left, the first “folder” icon is an Open icon or
button. When
selected this icon will open a dialog window which can be used to browse to any location on your
computer and from which you can select and open any supported video file. Right click on this folder
icon will open a list of Recently Opened files.
12.2.0 Save Icon: The second “disc” icon is a Save button. This is for the creation or
saving of a
project file. If you have a project file open in VS3 and you click this icon it will save your work to
the currently open project file. If you have not created, or do not have open a project file and you
click this icon, a dialog window will open allow you to create a new project file by assigning it a
name. It the project already has a name assigned to it, click this button will Save your current changes
to this open project.
12.3.0 Undo/Redo: The next set of backward and forward pointing circular arrows are
undo and redo
buttons. These buttons have an identical function to the undo / redo buttons found in the bottom Video
Editing Menu.
12.4.0. Images: The next camera icon, along with the Export Frames checkbox next to it,
do similar
things. When a
video is playing or open on the screen and the camera icon is clicked, the frame currently displayed
will be saved as an image file. This file will be saved to the default Images folder found here:
Documents\Video Surgeon 3\Images\.
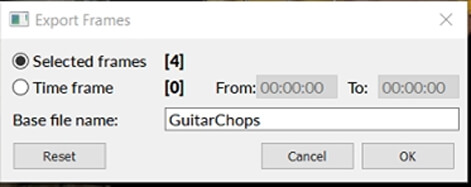
12.4.1 The Export Frames checkbox allows you to select this checkbox at any time while
you have a video
open. As soon as the video frame for which the check box is selected is moved, either forward or
backward, the box will again become unchecked. This system allows a user to select multiple video frames
within a video. When all frames of interest have been selected, clicking the Export Frames text will
open a
dialog window (shown to the right). From this dialog window the number of frames selected using this
checkbox is shown and a user can assign a base name for these images and then click the OK button to
export them and save them to the Images subfolder referenced above.
12.4.2 Alternatively, the radio button for Time Frame can be selected and then times
values inserted
into the from and to fields. When this is done, VS3 will show the number of frames selected. Keep in
mind that most videos have roughly 25 frames per second. Selecting a time span of just a few seconds
will create a large number of image files. As with the “Selected Frames” radio button, once the
selection has been completed, a base file name can be assigned and these images file will then be
created by clicking the OK button.
Final Note: When you save a video frame as an image, VS will save the image as it appears on the screen.
If you maximize the VS UI which will enlarge the screen size and thus the image, you'll get a larger
image. If you collapse the bottom timeline area which will again make the image larger, you will get
this larger image when use this image tools. Lastly, if you zoom in and/or reposition the video on the
screen and then use this tool, the image saved will be of that which you see on the screen.
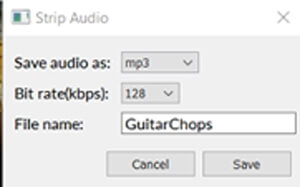
12.5.0 Grab Audio: The next Music Note icon, in this top submenu, has the
function of stripping
the audio from the video and saving it. When a video is loaded in VS3 and you click this icon you will
see the following dialog window. From here you can assign a name and select a file type for saving.
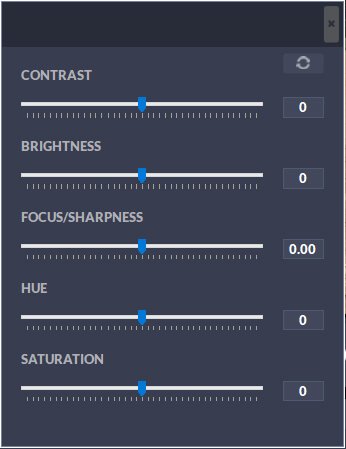
12.6.0 Video Quality Settings: The next icon on this toolbar is the pencil in a square.
This is a video
quality button. When selected you will see the following dialog window. From this dialog you can change
the contrast, brightness,sharpness, hue or saturation of a video. The changes made from this window
affect the
entire video. They cannot be applied to a portion of it. Also, any changes made here will be applied
permanently if the video is exported and a new video created.
12.7.0 Video Rotate: The next menu item is the Rotate button. After you select this you
are given
several options for rotating or changing the orientation of the video. Videos that are filmed on mobile
devices, when added to or played on non-mobile devices, often need to be rotated so they appear
correctly when played.
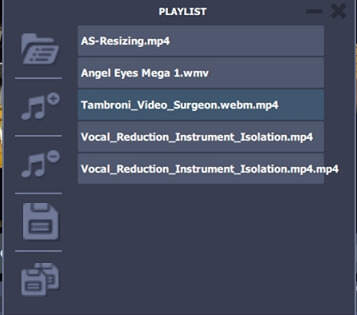
12.9.0 Playlist: The Playlist feature is the next item displayed on this toolbar. This
is a new feature
in VS3. When you click this button the playlist dialog window will open. It should look like this. This
playlist feature allows you to create and save Video Surgeon playlists (.vpl files). It does not open or
import playlists from other programs.
12.9.1 On the left of this Playlist dialog are icons. The first is for opening an
existing
playlist. The second
is for adding a file, the third for removing a file, the fourth is for saving changes to an existing
playlist, and the bottom is for saving a playlist for the first time and assigning a name.
12.9.2 If you have more files than will fit in this window, a scroll bar will appear on
the right.
Additionally the items in a playlist can be re-ordered by left clicking on one and holding. Once blue
shading appears around it you can then drag and drop it to a different location within the list.
12.10.0 Split Screen: The last item on this Top Submenu toolbars, on the far right, is
the Split Screen
button. This is a new feature found in VS3. It allows users to open and playback two videos at the same
time. Two real world use examples are: 1. ) before and after videos of the same movement or action and,
2.) two copies of the same video with zoom applied and the focus of each on a different part of the
video screen.
12.10.1 By clicking the split screen button you activate the split screen playback
mode. If you have a
video open in VS3 when clicking this button, this first video will be automatically assigned to the left
playback window. To add a video to the right playback screen grab one of the currently open videos, in
the Video Sessions list (see #4 above) and grab and drag it to the open position. Users may also grab a
video in the left or right position and move it to the other.
12.10.2 At the very top of the two playback screens VS3 displays the following
information. File name,
speed, zoom level, and key. Also note, immediately after the file name, there is a small lock symbol
that, in the image above, is unlocked. Users can manipulate these videos separately or individually by
selecting one or the other. This is done my clicking in the top gray frame area with the information
just mentioned is displayed. When a video is selected that area will become a lighter gray color. Once a
video is selected it can be controlled in much the same way that a video can be that is NOT in the split
mode. It can be zoomed, repositioned, speed (tempo) changed, and key changed.
However, once you lock the videos, any adjustmeent or changes to zoom, tempo, and key that are made to
one will also be made to the other.
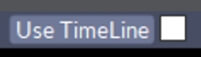
12.10.3 Also note the “Use Timeline” checkbox found in the splitscreen frame. If you
select this
checkbox in one of the split screen frames, it will use the timeline for that video during the split
screen playback of both videos. For example if there is a loop on one timeline but not on the other
video timeline, and you select the Use Timeline Checkbox on the video with the loop, then when you play
these locked videos it will loop both videos, using the timeline and loop settings from that video. The
selection of this checkbox also will sync the starting
playback position of the two videos at the position of the video selected. If this option is not
selected then VS3 will use the individual timeline settings (for example loops or no loops) and the
playback position found on each timeline.
Clicking the small X on the far right side of each of the two display windows will remove that video
from the split screen. Clicking the Split Screen button when in the split screen mode will return VS3 to
the single screen mode.
13
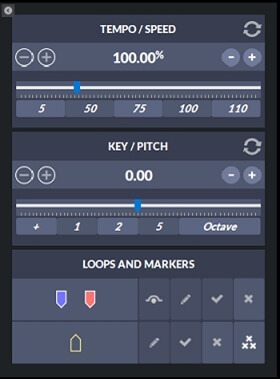
The left side TKLM menu contains the controls for speed (tempo), key, loops, and markers. This panel has
a small collapse button at the very top left. When selected this panel will collapse and disappear. This
small icon will stay visible on the screen and when clicked again the panel will again appear on the
screen.
13.1.0 Tempo or Speed: Starting at the top is the Tempo or Speed control section. By
default, when a
file is opened, the speed will be set to 100%. The +/- buttons on the left when clicked change the speed
up or down 1% at a time. The same, smaller buttons on the right/left, when clicked, change the speed by
.01%
at a time. The circular arrow at the top right is a reset button that will return the tempo to its
default state of 100%. The tempo displayed is shown in the center top area of this module. This value
can be selected with one’s mouse and this value can be edited directly with your keyboard.
13.1.1 Below this top control area, there is a slider, which can be grabbed and slid
left or right to
very quickly change the tempo. The range for this setting is 5 – 400%. Below this slider are a series of
presets which, when clicked changes the tempo to the displayed value. These presets can be changed in
the Options button of VS3.
13.2.0 Key or Pitch: Below the Tempo module is the Key/Pitch module. The controls for
this module are
virtually identical to the above tempo module. All of the controls found in this module work in the same
way as described above for the Tempo module. There is one small difference in the controls which is in
the bottom preset area of this control. Note the + button at the far left. When the preset values are
clicked they will increase the key by the number of half steps indicated in the preset. When this +
button is clicked it will toggle to a minus – and thereafter when the presets are clicked the key will
be decreased or adjusted downward by ½ step at a time.
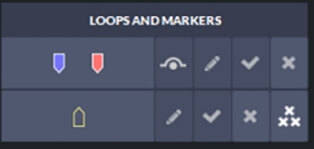
13.3.0 Loops and Markers: The bottom 1/3 of this TKLM module is the Loops and Markers
section. Loops are
areas bounded by a Blue starting and Red, ending marker. The purpose of a loop is to isolate an area or
segment of the video for repeated playback and to which custom tempo, zoom, key, and other settings can
be applied. Markers are different than loops. The only function of a marker is to note, highlight or
mark, a specific point or section of a video, so it can be more easily identified or located.
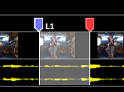
13.3.1 Moving Loops and Markers: Once inserted on the timeline markers and loop points
can be moved by grabbing them with your mouse and sliding to reposition them. They can also be nudged by
click on them with your mouse. When this is done, they will change to a brighter shade of the same
color. (Bottom image on the right sows the RED ending loop marker selected). Once you see this you can
nudge them by holding down your Control + Shift keys and the using the left or right arrow keys nudge
them in the appropriate direction.
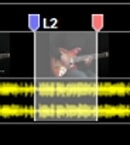
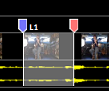
13.3.2 Loops: The first row, with the Blue and Red markers is the Loop section. The
Blue marker
represents the beginning loop and the Red marker indicates the ending loop. As a video plays, clicking
the blue marker inserts the beginning loop on the timeline and then as the video continues to play and
the Red
marker is clicked, the second or end loop point is inserted and the area between the two become shaded
to
show a completed loop. A second way to insert or create a loop is to left click in the loop area to set
the beginning and then move to the right and right click in the looping area of the timeline. Once a
loop is created on the timeline the beginning and ending points can be grabbed with the mouse and
repositioned as desired. A loop, as it appears on the timeline, is found to the right.
To the right of the blue/red markers are the following icons: Loop Bypass, Loop Controls, Loop List DB,
and a Delete Loop icon.
13.3.3 The loop bypass icon when clicked turns off the loop(s) thus allow the loaded
video to
play as if the loops didn’t exist. If a loop is not selected by having the progress indicator inside of
it, then click the loop bypass button will bypass ALL loops. If, however, a single loop is selected then
clicking the bypass button only bypasses or turns off that loop.
13.3.4 Loop Controls Dialog: The next item, the Loop Controls, opens a dialog window of
controls for the
loop which is selected by the progress indicator. This window is show here to the right. At the top of
this dialog is the loop name or label. By default VS3 uses the nomenclature L1, L2, L3, etc. By clicking
in this Label area the name assigned to this name can be modified.
Following this is a Loop On check box. This is essentially a loop bypass but unlike the loop bypass
button found in the TKLM menu this is a bypass for only this loop.
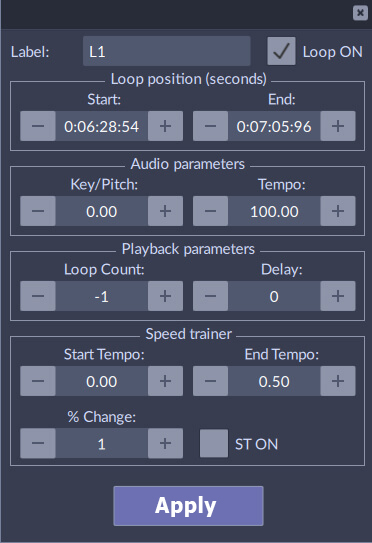
Below this are the start and ending times for the loop. The loop position can be changed by clicking in
these text boxes and modifying the values.
Next are the key and tempo parameters. They show the parameters currently being applied to the loop.
By clicking in the text box or using the +/ - buttons these values can be edited.
The next section contains the loop playback parameters. On the right is the Loop Count setting. By
default it is set to -1 which means it will play or loop infinitely. By editing this value users can
change how many times a loop will play. The Delay setting on the right is a value in seconds. When a
loop is playing, inserting a delay value will cause the playback to pause at the end of the loop before
jumping back to the beginning to resume playing.
Speed Trainer: The last section at the bottom is the Speed Trainer section and
settings. The Speed
Trainer is a useful feature designed to allow a user to practice a passage at gradually increasing
speeds. Select the start tempo, the end tempo, and the “% Change” (all in percentage), and the Speed
Trainer
will play the loop until it reaches the end tempo, increasing by the designated amount each
loop-through. For
example, selecting 50, 100, and 5 will begin the loop at half the original speed, and increase the tempo
by 5% on each playback until it reaches the original speed or 100%. This feature can also be used in
reverse, to
slow down a loop gradually. The “ST ON” checkbox must be checked or selected in order for this feature
to function.
13.3.5 The next item in the Loops Menu (2nd from the right) in the TKLM menu is an icon
that looks like
a check box. When this is selected a dialog opens that shows a listing or DB of all of the loops and
their positions on the time line. This dialog contains a search function at the top that enables a user
to search by loop name.
13.3.6 The right most icon in this loop menu row is an X. This is a loop delete button.
If a loop is
selected by having the progress indicator inside the loop and this X button is clicked, it will delete
only the selected loop. If there are multiple loops and no loop is selected – and this icon is clicked,
all loops will be deleted.
13.3.7 There are some additional Loop settings which can only be opened from the
timeline once a loop is
created and appears on the timeline. This menu is shown to the right. It can be opened by right clicking
within a loop when it appears on the timeline. From top to bottom here are these additional
settings.
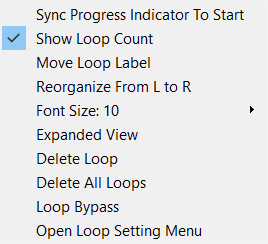
Sync Progress Indicator moves the progress indicator to the beginning or starting point of that loops
Show Loop Count when selected inserts a small number in the middle of the loop and counts the number of
times the loop is repeatedly played.
Move Loop Label changes the label used to define the loop from the left or beginning loop to the right
or ending loop.
Reorganize From L to R: When loops are created they are labeled L1, L2, L3 etc. Created Loops can be
placed anywhere within a video so, for example, L1 could be at the end of file, L2 at the beginning of
the file and L3 in the middle somewhere. The selection of this option renumbers the loops from L to R in
sequence. In this above example, L2 would become L1, L3 would become L2 and L1 would become L3
The Font size setting allows users to change the size of the font used for the loop label
The Expanded View setting, when selected, centers the selected loop and then zooms in so the loop fills
approximately 80% of the timeline.
The next two items are self explanatory. Delete loop will delete only the loop from which this right
click menu has been opened. Delete All will delete all loops
Loop Bypass is a loop specific bypass for only this loop. The global loop bypass is found in the left
hand KTLM menu.
Open Loops Settings is another way for you to see the loops settings menu. It opens the identical menu
found when the edit or pencil in the left KTLM menu is clicked.
13.4.0 Markers: The next row of controls, immediately below the Loop area is for
Markers. Here we have
from left to right the following items: Edit Marker, Marker List, Delete Marker, and Delete All Markers.
13.4.1 The Edit Markers dialog opens a small dialog window that shows the label name
assigned to the
marker, the timing or location where it is found on the timeline and the frame number it coincides with.
These values can also be editing from this menu.
13.4.2 The next item in the menu is a Marker list or database. Where dozens or hundreds
of markers are
used within a single file to annotate a video, it can be difficult to quickly find a specific marker.
This option opens a list that can be searched. By double clicking on a specific loop label in this
window, the progress indicator is automatically moved to that marker so a user can easily find it.
13.4.3 The last two items are self explanatory. When the progress indicator is over a
specific marker
and the delete marker button is clicked only that marker is deleted. If the last, Delete All button is
clicked, all Markers will be deleted.
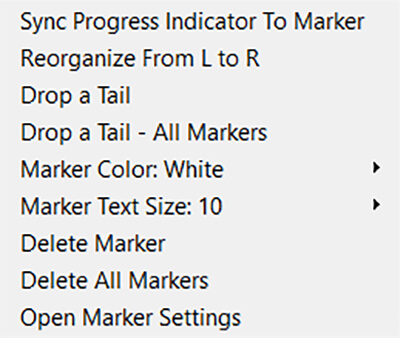
In addition to these marker settings, right clicking over top a marker as it appears on the timeline
will
open the follow submenu with additional options and controls.
Sync Progress Indicator moves the progress indicator to the specific marker from which this menu was
opened.
Reorganize From L to R: When markers are created they are labeled M1, M2, M3 etc. Created markers can be
placed anywhere within a video so, for example, M1 could be at the end of file, M2 at the beginning of
the file and M3 in the middle somewhere. The selection of this option re-numbers these markers from L to
R in sequence. In this above example, M2 would become M1, M3 would become M2 and M1 would become M3
Drop a Tail shows a line extending downward from the center point of this marker onto the video timeline
to provide a more accurate positioning of a marker, for this marker only.
Drop a Tail – All Markers: is the same as above except it applies this tail to ALL markers on the
timeline.
Marker Color: This option allows the user to select one of several different colors for this marker.
Also within this option is the ability to apply this color to ALL markers.
Marker Text Size: This option allows the user to select and apply a custom font or text size to this
marker or to apply that custom size to ALL markers.
The next two items are self explanatory. Delete Marker will delete only the marker from which this right
click menu has been opened. Delete All will delete all markers on the timeline.
Open Marker Settings is another way for you to see the Marker settings menu. It opens the identical menu
found when the edit or pencil icon for Markers in the left KTLM menu is clicked.
14
Video Playback Controls

14.1.0 The play/pause button  is found
at the far left of this area. Clicking this button will start a video
playing. Clicking it a second time will cause the video to pause at its current location. Clicking again
will cause the playback to resume.
is found
at the far left of this area. Clicking this button will start a video
playing. Clicking it a second time will cause the video to pause at its current location. Clicking again
will cause the playback to resume.
14.2.0 Next to the Pause/Play button is the Stop button  .
Clicking the Stop button, stops playback and causes the
progress indicator to return to the beginning of the file.
.
Clicking the Stop button, stops playback and causes the
progress indicator to return to the beginning of the file.
14.3.0 After the stop button is the volume control  .
Clicking the volume icon will mute the volume
completely. Clicking it again will unmute the volume. The vertical bars are an indicator of the volume.
Clicking on a vertical bar will set the volume to the bar clicked, changing the volume up or down
accordingly..
.
Clicking the volume icon will mute the volume
completely. Clicking it again will unmute the volume. The vertical bars are an indicator of the volume.
Clicking on a vertical bar will set the volume to the bar clicked, changing the volume up or down
accordingly..
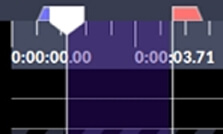
14.4.0 The area to the right of the volume is the playback counter  .
VS3 shows the total length of the
video being played in hours/minutes/seconds/hundredths of seconds. It also shows the playback position
for the video.
.
VS3 shows the total length of the
video being played in hours/minutes/seconds/hundredths of seconds. It also shows the playback position
for the video.
14.5.0 Frame–By–Frame Controls:  The
next
section of the playback controls is the frame-by-frame scrolling
area. Clicking a negative value (-1. , -.25, etc. ) will cause the video to move backward by that
amount. The available are 1 second, .25 second, .1 seconds, and 1 Frame. Similarly clicking a positive
value will advance the video forward by the indicated value.
The
next
section of the playback controls is the frame-by-frame scrolling
area. Clicking a negative value (-1. , -.25, etc. ) will cause the video to move backward by that
amount. The available are 1 second, .25 second, .1 seconds, and 1 Frame. Similarly clicking a positive
value will advance the video forward by the indicated value.
14.6.0 Video Zooming:  The next item
as we move to the right is the Video Zoom slider. It can be grabbed and dragged with a mouse or the +
and – buttons can be clicked to increase or decrease the zooming of the video. As a video is zoomed–in
and it becomes larger than the screen, parts of the video will be pushed off the screen and not visible.
The video can be repositioned by pressing and holding down the Control key PLUS left clicking on the
video and holding the mouse button down and then dragging left/right or up/down to reposition the video.
The next item
as we move to the right is the Video Zoom slider. It can be grabbed and dragged with a mouse or the +
and – buttons can be clicked to increase or decrease the zooming of the video. As a video is zoomed–in
and it becomes larger than the screen, parts of the video will be pushed off the screen and not visible.
The video can be repositioned by pressing and holding down the Control key PLUS left clicking on the
video and holding the mouse button down and then dragging left/right or up/down to reposition the video.
Another way to zoom-in is to marquee an area. To do this hold down your Control + Shift keys and then
with your mouse left click and drag and draw a triangle around the area of interest and the let go.
Video Surgeon will respond by zooming in on this section and repositioning in the visible area of the
screen for you.
14.7.0 Full Screen:  The last item on
the far right is the full screen mode button. When this is clicked
the video is resized to the full screen. Once in the full screen mode, users can return to the previous
non-full screen view by selecting this button again, or by tapping the Escape button on their keyboard.
The last item on
the far right is the full screen mode button. When this is clicked
the video is resized to the full screen. Once in the full screen mode, users can return to the previous
non-full screen view by selecting this button again, or by tapping the Escape button on their keyboard.
15
Video Editing Tool Bar

15.1.0 The first two icons on this toolbar on undo/redo buttons  .
They are placed here for convenience and they are also found in the Top Submenu.
.
They are placed here for convenience and they are also found in the Top Submenu.
15.2.0 Before the next series of icons and functions on this toolbar can be used, users
must first
select a portion of the video on the timeline to apply these functions to. That is done use the
selectors that are associated with the progress indicator shown to the right. Using a mouse the left
(blue) or right (red) slider can be grabbed and dragged. When this is done a selection is made and the
area that is selected becomes shaded. The selected area is the area to which the following series of
editing functions will be applied.
15.3.0 Copy: The first icon to the right of the undo/redo buttons on this toolbar is
this
copy button  . Once an area has been selected, clicking
this button will copy that selection.
. Once an area has been selected, clicking
this button will copy that selection.
15.4.0 Paste: The next icon to the right of the Copy button is the Paste button  . Clicking
this button will
cause anything that has been copied to be pasted onto the timeline. When you execute this function you
will see three options. They are: paste at the beginning, end or at the current position.
. Clicking
this button will
cause anything that has been copied to be pasted onto the timeline. When you execute this function you
will see three options. They are: paste at the beginning, end or at the current position.
15.5.0 Erase/Delete –  This option
will erase or delete the selected area from the
timeline.
Cut –
This option
will erase or delete the selected area from the
timeline.
Cut –  The cut command causes the selected area to be
copied to the clipboard. This selected area remains
on the timeline and is not deleted UNTIL the selected area that was cut, is pasted somewhere else. At
that
point not only is the selection pasted to the designated area but the selected area is then deleted or
removed from the timeline.
The cut command causes the selected area to be
copied to the clipboard. This selected area remains
on the timeline and is not deleted UNTIL the selected area that was cut, is pasted somewhere else. At
that
point not only is the selection pasted to the designated area but the selected area is then deleted or
removed from the timeline.
15.6.0 Volume:  This option allows you
to adjust the volume of a selection or segment of
a video either
up or down.
This option allows you
to adjust the volume of a selection or segment of
a video either
up or down.
15.7.0 Silence:  This option allows
users to add or insert silence. One can either silence
the selected area
or one can insert X seconds of silence at the beginning, end, or at the current position.
This option allows
users to add or insert silence. One can either silence
the selected area
or one can insert X seconds of silence at the beginning, end, or at the current position.
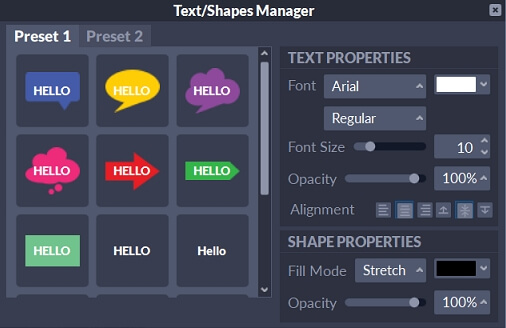
15.8.0 Text/Shapes: The next item on this toolbar is the Text/Shapes tool. When this
“T” icon is clicked
the following dialog window is opened.
15.8.1 A variety of shapes and/or plain text can be inserted onto the video using this
function. Users
can grab the preset of interest with their mouse and drag it onto the video, or it can be dragged onto
the timeline in one of the 3 T/S rows.
15.8.2 Once the item is on the video it can be resized by grabbing it and stretching or
shrinking it. In
addition, both the text and the shape properties can be controlled or set using the tools on the right.
This includes font size, font type, font color, opacity, and alignment, and for Shapes, the Fill Mode,
color and opacity.
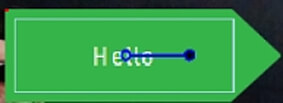
15.8.3 Once on the screen the T/S item can be grabbed with a mouse and moved or
repositioned anywhere on
the video. The orientation of the T/S information on the screen can be changed by clicking on the dot at
the end of the blue line that is found in any of the shapes and then turning the item by moving your
mouse up or down.
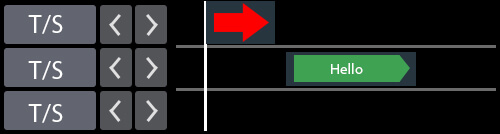
15.8.4 The duration that an item appears on the screen can be controlled by selecting
the placeholder
for the Text/Shape in the timeline area and by moving it or stretching and shrinking it. This allows
a user to control when it appears and for how long will appear. Up to 3 Text/Shapes can appear on the
timeline at the same time and their relative position to each other is controlled by the movement and
positioning on the timeline.
15.8.5 Text/Shape object can be removed from the video by selecting them, either on the
timeline or on
the video, and then tapping your delete key.
15.8.6 When a new video is created using the Export command, any text or shape inserted
onto the
video will become part of the video. Similarly, any Text/Shape inserted on a video will be stored as
part of a Video Surgeon project file.
15.9.0 TimeLine Zoom: The next item on this tool bar is the timeline zoom slider and
plus/minus buttons.
As the timeline is zoomed the progress indicator is automatically moved and centered within the
timeline. As the zoom increases there is a smaller amount of time being displayed and the time displayed
will have increasingly smaller units. At maximum zoon the entire timeline will display one second of
data.
15.10.0 Time Line Scroll Bar: As the timeline is zoomed, especially a large amount,
much or most of the
timeline will be off-screen. This scroll bar allows users to grab it and rapidly scroll through the
entire timeline while zoomed in. This allows for a specific marker, loop, or other identifying feature
to be found quickly and easily.
16
The white Progress Indicator also contains, nested on its left and right, the selection tool. The
progress indicator moves along the timeline as the video is played. The progress indicator can also be
grabbed with a mouse and moved forward or backward thus rapidly changing the playback position. By
clicking anywhere on the numbered timeline the progress indicator will jump to that location.
16.1.0 The Blue and Red handles form the selection tool. This tool is used to identify
a segment of the video on which to apply one of the editing functions. Double clicking the white
progress
indicator will cause the selection tools to return to their default position and nest against the
progress indicator.
17
The last area at the bottom of the VS3 UI is the timeline area. A picture of this can be seen here on
the right.
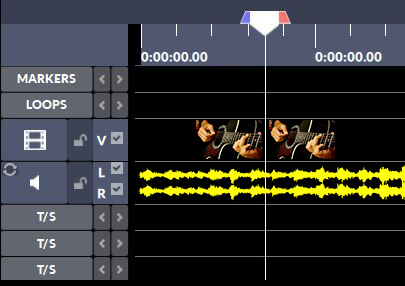
Just below the numbered timeline, the first area or channel that can be seen is the Marker area. This is
the area where any Markers inserted onto the timeline appear. This area can hold an unlimited number of
markers. The small
left and right arrow buttons next to the word “Markers” are Jump To buttons that when clicked will jump
forward or backward to the next Marker
17.2.0 Below this is the Looping Area. When loops are created this is where the looping
markers, the Red
and Blue beginning and ending points will appear. As with the Markers channel, this channel also
contains the left and right arrow Jump To buttons.
17.3.0 Next, as we move down, is the channel for the video. Next to the video frame
icon a small Lock
icon appears. This can be locked or unlocked by clicking on this icon. When locked the video data cannot
be edited. Following this is a small checkbox. When checked the video is displayed in the main playback
area. If this box is unchecked, the video in the VS3 UI disappears and when played there will be no
video. To the right of this checkbox is the channel which displays the video. Here you can see video
thumbnails which VS3 inserts at the rate of 1/second of video.
17.4.0 Below the video channel is the audio channel. Here you can also see a lock icon
which, like it
does for the video, can be locked to prevent this data from being edited. Also next to this lock are L
and R letters with checkboxes for the L/R audio channels. Users are able to check or uncheck these to
play one or two channels of audio as desired. The unchecked channel(s) will not play when the video is
played. To
the right of these checkboxes is the plotted audio data or waveform.
17.5.0 A/V Synchronization – There are files in which the audio and video are not
synchronized. VS3
enables you to fix this by allowing you to click in the yellow plotted audio data on the timeline and
select it. Once selected the Left and Right arrow keys can be moved to slide the audio left or right, as
necessary,
to synchronize the audio and video. The graphic icon in the far left of this channel which consists of
two circular arrows is a reset button. When clicked this will reset the Audio and Video to their default
synchronization.
17.6.0 The bottom three T/S channels are used by the Text/Shapes Tool. When you insert
text or shapes
onto a video, a thumbnail of that item will appear in these channels at the exact timeline location that
it appears on the video. These thumbnails can be moved or placed in any of these three channels. And,
since their are three, up to three of these T/S can be inserted onto a video at the same point in time.
When this is done they will overlap with each other here on the timeline. These text/shapes thumbnails
can also be grabbed
with a mouse and dragged left or right to be reposition. They can also be stretched or shrank to change
their duration on the video.
18
Foot Pedal Support
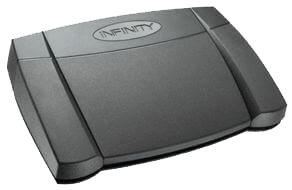
Video Surgeon provides a foot pedal interface for hands-free operation for several of the key playback
functionalities. Currently Video Surgeon utilizes the VEC- Infinity IN-USB-2 or 3 foot pedal, via a USB
connection. A picture of the foot pedal is shown below. It can be
found on Amazon at this link.
The Infinity Pedal has three switches or pedals. The center pedal can be used to Start and Stop the
playback of the currently open video file. The left pedal has two functions. When depressed once ( a
single click ) it rewinds the playback to the BEGINNING point of the current loop. If double clicked, it
causes the current position to jump BACKWARD to the BEGINNING point of the next previous loop.
Subsequent double clicks will again cause the progress indicator to jump out of the current loop and
BACKWARDS to the previous loop until there are no more previous loops.
Similarly, the right button of the pedal when depressed ADVANCES the playback position to the next
BEGINNING loop point, and with subsequent clicks of the pedal continues to ADVANCE to the next BEGINNING
loop points until there are no more.
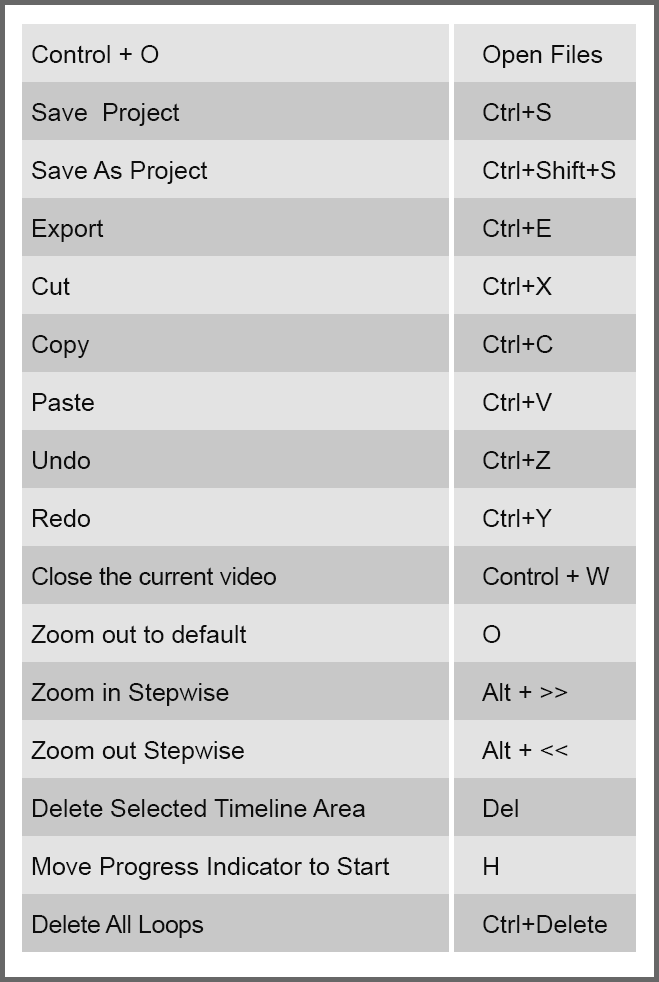
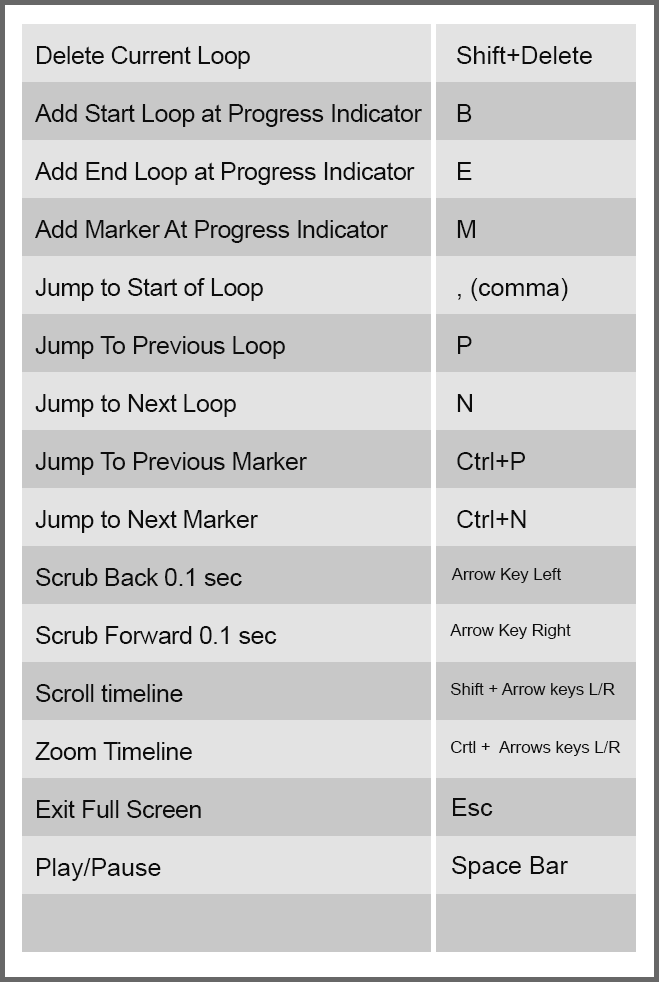
19
Keyboard Shortcuts
The table below displays keyboard shortcuts for common operations in Video Surgeon.