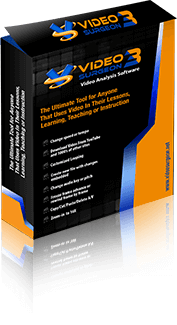
Let’s begin with an overview of the layout of the main user interface, which is shown below.
1

Opening a file – There are two ways to open files in Video Surgeon. The first is to use the Open
button found at the Top Menu of the software interface. The second is to drag and drop a file onto the
Main Video area. VS opens two main types of files. One type is a Video Surgeon Project files or .vsp
files. These files store information about VS settings and when opened recall those settings and apply
them to the video. The second type of files VS opens are video files. Video Surgeon opens the most
common video file formats. These include: avi, mp4, m4v, mpg, mpg2, mov, flv, mkv, wmv, mts and rm. A
recently used files list is available by right clicking on the Open Button. If you attempt to open
videos with high fps (frames per second) rates, Video Surgeon may display a warning as some high fps
videos cannot be opened successfully. Normally speaking VS can open videos with approximately 100 fps
successfully. Above this rate issue may be encountered.
2
Migration of Version 1 Project Files – VS 2 will open VS 1 project files. However, as part of the
process of opening, VS 2 may need to convert the video file associated with the Version 1 .vsp file. To
avoid the need to make this conversion EVERY time a VS1 project file is opened, execute the SAVE command
on this file before closing it. This will convert it to a Version 2 project file. Also if possible save
the updated project file in the default location specified in the Options button for Project Files. This
is especially important if you are using the option to delete unused, converted files. See Item #26 for
more details.
3

Saving a file – Saving is quite different from Exporting and it is important to understand the
difference. When you use the SAVE command, VS stores the settings of all items applied to the open
video. This includes tempo, pitch, loops, loop settings, and markers. In addition VS stores in the .vsp
file the path to the video in use. When you open a .vsp file, VS recalls all of these settings and
reapplies them to the video that it opens from the stored path. Saving as a .vsp file does NOT apply any
permanent changes to the video.
4
Exporting – Exporting a file, unlike the SAVE command, will apply changes you have  made to the video and create a completely new
video file in
made to the video and create a completely new
video file in 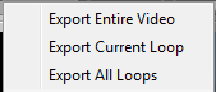 which these changes will reside.
Changes that can be exported include: Tempo, Pitch, Edits, and Loop counts. When you choose Export, you
will immediately see three options. Let’s review these three:
which these changes will reside.
Changes that can be exported include: Tempo, Pitch, Edits, and Loop counts. When you choose Export, you
will immediately see three options. Let’s review these three:
~~> Export Entire Video means that VS will export and create a new file using the entire video, and
apply any and all changes made to this entire video, embedding them into the new one.
 ~~>Export Current Loop
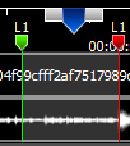
means that VS will Export the video data within the current loop selected. A loop is selected by placing
the blue progress indicator with a loop area as shown in the accompanying illustration. This selection
means that the new video created will contain only the video data from this defined area. Moreover, any
tempo or key changes applied to this looping area will also be embedded into the file created.
~~>Export Current Loop
means that VS will Export the video data within the current loop selected. A loop is selected by placing
the blue progress indicator with a loop area as shown in the accompanying illustration. This selection
means that the new video created will contain only the video data from this defined area. Moreover, any
tempo or key changes applied to this looping area will also be embedded into the file created.
~~> Export All Loops means that Song Surgeon will Export all of the data of all loops that have been
created in the currently open file. In addition, it will apply all of the changes stored within each of
these looping areas to that specific looping area. This means for example, that one loop can be set at
50%, a second at 25%, and another at 75% and when exported the video data from each of these three areas
will be slowed to those corresponding speeds or tempos. Lastly, when you export All Loops, VS will place
the data from these looping areas back to back, with no space, and it will ignore all other parts of the
video, and will not export any other parts of the video.
After you select one of these three options, VS then opens a dialog window that appears below.
 An explanation of these
options follows.
An explanation of these
options follows.
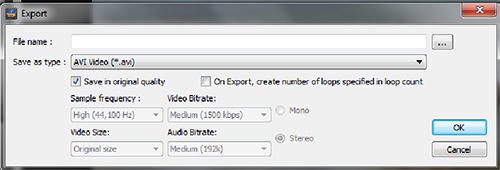
File name field requires you to provide a name for the new file you are about to create. In addition,
the button to the right with three dots is a browse button that allows you to over-ride the default
location for storing these exported videos which is set in the Options button.
‘Save as type’ allows you to select one of several file types: Avi, flv, mov, mpg1, mpg4
Save in original quality is selected by default. This selection preserves the quality of the video when
you create a new file. If you deselect this box, the other video quality settings will become active.
You can then select your own parameters for the new video you will create upon Export.
“On Export, create number of
loops specified” creates multiple copies of whatever you are about to Export. To be more specific, it
will create the number of copies specified in the loop count box of the Loop Edit dialog box.
Be default the loop count is set to 999 so as to loop infinitely. Therefore if you check the “On Export
create number of loops specified” checkbox you will be telling VS to create 999 copies of whatever you
are exporting. If the area being exported is a minute, for example, you are telling VS to create over 16
hours of video. This is probably not what you really want. Such a selection could use significant
system resources, and on older, lower powered machines could cause your machine to freeze or crash
so use this setting with caution.
On the other hand, if you change this setting to 5, it will create 5 copies on Export, and this indeed
might be useful as a way to provide repetitive playback of the video you are creating, when it is played
outside of Video Surgeon.
5
Video Sources – VS can open videos from most sources that use common video file formats. These
can include videos that you have on your computer, videos shot on a home video camera, videos that you
download from the internet, and videos on DVDs. In the last case of DVDs, VS cannot rip and cannot
open videos that are protected or encrypted.
6
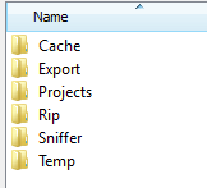
Managing Videos – When installed VS creates a Video Surgeon folder and within it creates a number of
subfolders for storing and organizing videos used by Video Surgeon. The folder is commonly found in your
User Profile on your Window’s machine. For example, on Vista, 7 or 8 machine it is located in:
C:\Users\**your-user-name**\Video Surgeon 2.0\
Within this Video Surgeon folder there are
seven subfolders as shown nearby. These should be self explanatory. For example, the Export folder will
contain the videos your create on Export.
If you’d like to change these default paths, you can do so by going to the Options button in the Top
Menu. In addition, this Options button allows you to control the default location invoked when
you select the Open button.
7
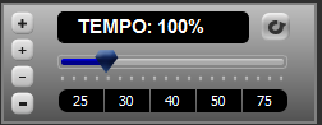
Tempo or Speed Change – The Tempo feature is found in the Side Control are of VS. Tempo can be
decreased or slowed to 25% and it can be increased to speed up to 200% of the original in real time.
The tempo control area
contains a number of presets for your convenience. If a tempo different than specified in the presets is
desired there are a number of ways to select it. One is to grab the blue triangular shaped slider and
move it to the approximate tempo. Once you get close you can then fine tune it more by using the plus
(+) and minus (-) buttons. The thicker +/- controls change by 1% at a time. The buttons with the thinner
symbols move by .01 or 1/100 of a percent. As you can see VS allows you a great deal of precision with
regard to the selection of tempo. Lastly, the button at the top right of the Tempo control section is a
reset button that returns Tempo to the default setting of 100%.
Although VS cannot play the currently play video slower than 25%, you can achieve slower playback
speeds by exporting and then reopening this newly created file. For example, open a video and
slow it down to 25%. Export the video and create a new video at 25% of the original speed. Now open this
video and slow this new video to 25%. This file is now playing at 6.25% of the original video speed.
8
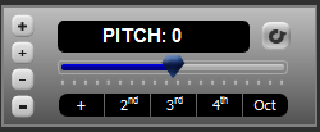
Pitch or Key change works in much the same as the Tempo controls discussed above. Pitch can be
increased or decreased by a maximum of 12 half steps in either direction (one full octave).
The Pitch control area
contains a number of presets for your convenience. The presets use musical units called intervals, such
as a third or a fourth. If you are not familiar with these you can just as easily use the buttons with
the thicker symbols on them to move up or down by half-steps. The buttons with the thinner markings
change by a Cent at a time, which is 1/100th of a half step. As you can see VS allows you a great deal
of precision with regard to the selection of pitch or key. Lastly, the button at the top right of the
Pitch control section is a reset button that returns Tempo to the default setting of 0 or no change from
the original.
9
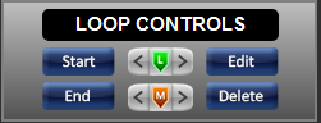
Loop Controls – Loop Controls for VS contain four blue buttons plus the center “jump to” buttons
one set with a green icon and the other with an orange. We’ll review each of these. On
the left side we have Start and End buttons. The Start button can be clicked while the video is paused
or while it is playing. When clicked it will set the beginning of a looping area by placing a vertical
green line in the Bottom Editing and Looping area at the location of the progress indicator. Similarly
when the End button is clicked it sets the ending loop by inserting a vertical red line. An alternative
way to set beginning and ending loop points is to left click and right click respectively in the Bottom
Timeline and Editing area. Once a loop is set you can fine tune its placement by grabbing it with our
mouse and sliding it.
On the right hand side of the Loop Controls area is the Edit and Delete buttons. When the blue progress
indicator is positioned within a loop area, and the Delete Button is clicked the loop will be deleted.
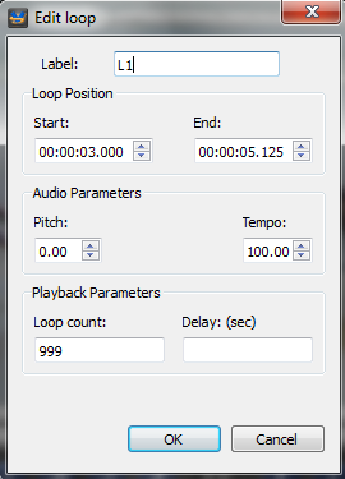
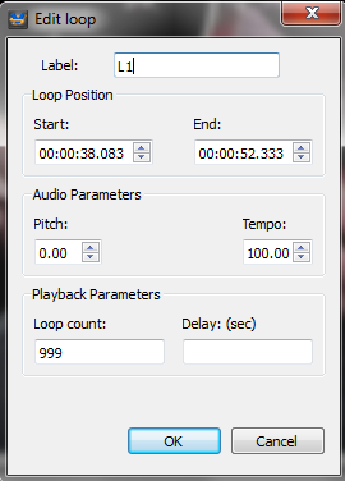
When the progress indicator is within a looping area, if the Edit Button is clicked, a Loop Edit dialog
window is opened as shown to the right.
From this Loop Edit Window you can
change or rename the loop by typing an alternative name in the Label field. You can also change the
starting and ending positions of the loop by adjusting the time down to thousands of seconds. In the
Audio parameters section you can adjust the pitch and tempo. Lastly in the bottom Playback Parameters
section you can adjust the loop count and Delay. By default the loop count is set to 999 which means it
will repetitively play 999 times before leaving a looping area and continue to play the next section. If
you want to limit the amount of repetitive playings you can change this number. Lastly the Delay refers
to a pause at the end of the loop before playback of this looping area resumes. By default it is set to
0. However, if you insert a number like 5, this means that once the playback of the loop reaches the end
point, it will pause for 5 seconds before jumping back to the beginning and playing again.
If you right click over top the beginning or ending loop points you will see a menu with the options of
Edit or Delete. This is simply an alternative way to access the Edit and Delete buttons found on the
right hand side of this Loop Controls area.
10
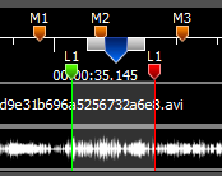
Markers are provided as a way to mark and therefore quickly locate a position within the open
file. As can be seen to the
right, Markers are orange and are inserted at the top of the Bottom Editing and Timeline area. Markers
can be inserted one of two ways. The first is by clicking the M Button in the Top Menu area of the user
interface. A second way to set a Marker is by clicking with your mouse in the Marker area, which is
located at the very top of the Editing and timeline area. By right clicking over a Marker, you are able
to delete the Marker or you can edit its name. Lastly a Marker can be repositioned by left-clicking and
hold and then dragging it with your mouse.
11
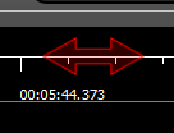
Timeline Zooming – It is sometimes helpful, especially for the accurate placement of Markers or
Loop Points, to be able to zoom in on the time line. To do this, place your mouse on the white
horizontal timeline, right click, hold, and drag. When you do this you will see a red, to sided arrow
appear. Once this arrow appears, while continuing to hold down the right mouse button, you can drag the
time line to the left (zooming out) or to the right (zooming in). As the time line elongates you can use
the left and right arrow buttons on your keyboard to move the timeline left or right to view any part
that is hidden.
12

Jump To Buttons – The center arrows in the Loop Control area are "jump to" buttons. Those in-line
with the orange triangle jump forward or backward on the timeline to the next marker. The arrow buttons
in line with the green triangle jump forward and backward to the next beginning looping point.
13
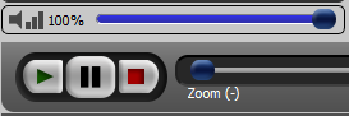
Playback Controls – The playback controls are found just below the main video viewing area. On
the left side are the Play, Pause and Stop buttons. Above these is a blue slider that controls the
volume. To the right of the Stop/Start buttons is another slider that controls the video zoom. Beyond
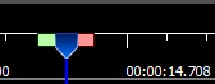
this zooming slider is the numerical playback position indicator. It shows two numbers.
 The first is the
current playback position within the file open on the screen, or the elapsed time. The second the total
time or length of the open file on the screen. In the above example, the current position is at 45.750
seconds and the total length of the open file is 5 minutes 28.0 seconds.
The first is the
current playback position within the file open on the screen, or the elapsed time. The second the total
time or length of the open file on the screen. In the above example, the current position is at 45.750
seconds and the total length of the open file is 5 minutes 28.0 seconds.
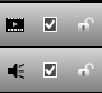 At the very bottom of the VS
interface, in the Bottom Editing area there is an on off selection box for both audio and video. When
selected both audio and video will play, however, you have the option to deselect either one, in which
case this track will not play.
At the very bottom of the VS
interface, in the Bottom Editing area there is an on off selection box for both audio and video. When
selected both audio and video will play, however, you have the option to deselect either one, in which
case this track will not play.
14

In the center of the Playback Control area is the FF or Freeze Frame Buttons. These buttons are to be
used when the video is paused. T he buttons to the left have a minus (-) sign on them to indicate that
they go backward or rewind the video. The buttons to the right are
forward buttons. The units of the numbers shown on these buttons are seconds except for the first button
to the left and right of the black FF label. These two buttons which have an “F” on them will move the
video forward or backward by ONE frame at a time.
These Freeze Frame buttons allow a user to move forward or backward in very small increments while a
video is paused to locate or isolate a frame or a series of frames that maybe useful or instructive, or
show specific information that is of interest.
To provide a frame of reference, please note that many videos have around 30 frames per second, so if
you advance or rewind a frame at a time, the time increment your are moving is very small, something
like .03 seconds. Also note that because a video is divided into frames, that if you click a 0.1 second
button it cannot move precisely .1 of a second because it cannot stop between frames it must display a
single frame on the screen, so it will move to the frame nearest to .1 of a second. The same of course
holds true for the other numerical buttons.
15
When you open a file in VS, VS will display the file characteristics at the very top left side of the
user interface. An example is shown to the right. From left to right, the following information is
displayed.
File name, file size, video size (px), frame rate (fps), audio bitrate, and audio frequency.

16
Video Display Size. There
are several ways to change the size of the video on your screen. The first is to use the full screen
view which you access in the same way you do for any other windows program. That is to select the middle
of the three buttons in the top, upper, right hand corner of the user interface.

A second way is to collapse the Top Menu and/or the Bottom Editing and Timeline Area. To do this simply
click the small black collapse button on the far right, near these menu areas, and
as you do you can toggle collapse (hide) and open (reveal) t his two menus. As you do you will see the
size of the video on the screen change. Lastly you can grab the edges of the VS main interface and drag
both left/right or up/down to resize the User interface which will also resize the video screen.
17

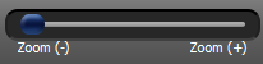
Video Zooming . There are three ways you can zoom in (enlarge) the video. One is by left clicking with
your mouse, on the video itself. Each click zoomx in 2 fold or 2X.
When you right click you zoom back out. A second way to zoom is to position your mouse over the video
and then with your mouse, left-click and hold down and then drag the mouse. As you do so you will be
drawing a rectangle. When you have drawn a rectangle over the area of interest, VS will zoom in on this
area. Lastly, you can zoom in by dragging the zooming slider found on the main playback control section
of the program, just below the video. Zooming can be applied while a video is paused or while a video is
being played. The combination of zooming in, slowing down, and looping is a very powerful tool that
allows a video to be dissected and analyzed for learning or instruction.
 When zooming you
can center the part of the image you’d like to see by right clicking and dragging the video image
open on the screen with your mouse.
Two other items of note. When you have a video zoomed in and you Print or Export it, the zoom
will be retained and printed or exported. To print the zoomed image of what you see on the screen, after
selecting print, you must then select “Fit Picture To Page”, in the print dialog box. Exporting the
zoomed video happens automatically, you are required to do anthing. Just remember if you are zoomed in,
when you export the video you create will also contain this zooming.
When zooming you
can center the part of the image you’d like to see by right clicking and dragging the video image
open on the screen with your mouse.
Two other items of note. When you have a video zoomed in and you Print or Export it, the zoom
will be retained and printed or exported. To print the zoomed image of what you see on the screen, after
selecting print, you must then select “Fit Picture To Page”, in the print dialog box. Exporting the
zoomed video happens automatically, you are required to do anthing. Just remember if you are zoomed in,
when you export the video you create will also contain this zooming.
18


The Rip button in the Top Menu area will rip DVDs
that are not encrypted or protected. DVD video files are stored as
.vob files on DVDs. These files can be as large as 1Gb in size, so ripping them can take some time and
consume your computer’s system resources. These .vob files are normall stored inside of a VIDEO_TS
folder on the DVD.
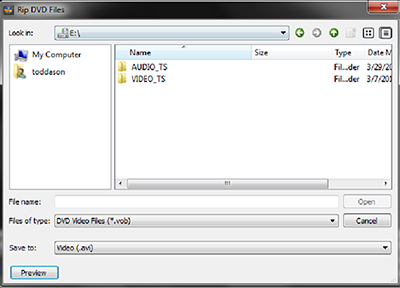
When you click the Rip Button, the windows
dialog that opens allows you to browse to find your DVD drive. It will also require you to assign a name
to the file you are going to rip, as well as allowing you to select the output format of the file.
Lastly, this dialog has a preview button which allows you to select a .vob file and play it in the
preview mode to assist you in identifying the specific vob file for which you are looking.
19

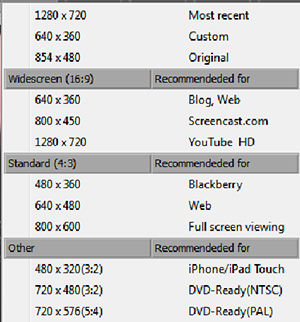
Aspect Ratio + Resizing – VS has a button in the Top Menu that allows you to change the size
a nd aspect ratio of a video that you currently have opened within the program.
Simply click the
Aspect Ration button and it will open a dialog which should look like that shown below. If possible, you
should choose a size that preserves the original aspect ration of the video. Why? Because if you choose
a size that uses a different aspect ration the overal image wll be distorted as the length vs. width
proportions are changed.
In addition to the presets contained in this window, please note that choice #2 is Custom which allows
you to change the dimensions to anything you’d like.
If you change the aspect ratio of an open video, you will see this reflected on the screen immediately.
However, the video size may not be discernable because V.S. automatically resizes the video to the
maximum size possible for the viewing area within Video Surgeon. On export, the video size you have
selected will be created and if you open the Exported video in Video Surgeon you will see in the video
properties at the very top of the screen. There you should see displayed the correct frame size which
you selected.
20

Undo/Redo – These functions are rather self explanatory. Perhaps the only thing we should point
out is that Undo/Redo does not apply to changes in video zooming. However, with all other operations
such as pitch, tempo, markers, loops and edits, undo/redo does work.
21
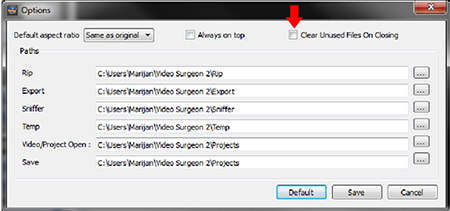
The Options Button in the Top Menu opens a dialog window that looks like this. Let’s review the settings
found within this window. Starting at the top, the first setting is the Aspect Ratio setting. We would
recommend that you use “Same as Original” as the default but you are free to pick others.
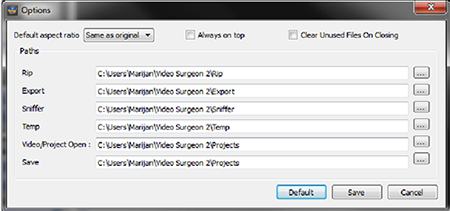
The Always on Top setting, if selected, means the
VS will always remain on top even when you have multiple windows and programs open at the same time.
Next you will find the file paths. These six settings are created and setup on install. If you would
prefer alternate paths you can use the button with three dots on the far right side of each path to open
a dialog window and browse and select an alternative path.
Please note, if a path this is selected in not a “real” path, but a virtual path, VS will not be able to
work correctly and it will cause an error when you attempt to perform a basic function like opening a
video.
22
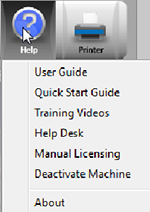
The Help Button contains a number of useful resources as well as some miscellaneous functions.
Let’s review these. The User Guide is the
document you are viewing right now. The Quick Start Guide is a brief guide which helps you get the
program download, installed, registered, activated, and running.
The Training Videos selection takes you to the training videos found on the Video Surgeon website. These
training videos demonstrate all of the major functions found in the program and will go a long way
toward helping you come up the learning curve quickly.
Manually Licensing is for machines that CANNOT be connected to the internet. Do not use this feature
without contacting the Help Desk first.
Deactivate Machine is an option that will remove the license from the existing machine the program is
stored on, and then transfer you to the My Account page of our website for you to log in, where you can
then delete the machine from your account. This feature is used when you have used all 3 of your
activations and you are getting rid of a machine and adding another. This process allows you to free up
a slot by deactivating and removing an old machine, so that you can license a new machine.
23
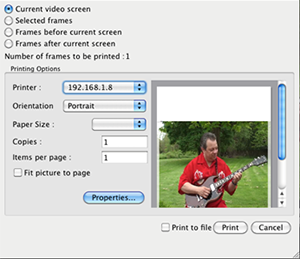
The printing function is new to Version 2. It is located at the top right hand side of the Top Menu bar.
This functionality enables you to print the frame in the VS screen or a series of frames that you select
using the selection tool. Let’s walk through the different options found in this printing dialog window.
The current video screen would print only the frame that is currently loaded into the main video viewing
area of VS. Selected frames means that all frames selected would print. The next two options are self
explanatory – frames before and frames after current screen. All frames, the last option means the
entire video.
Let’s be clear about this option. A video often has 30 frames per second. If you have a three minute
video and you select All Frames, you have just told the program to print 30 x 60 x 3 frames or 5400
frames. This is not probably something you’ll be doing very often. Please note that based upon the
option selected, the number of frames to be printed will be calculated and displayed in this dialog
window. In the present example you can see this number is 40.
To select frames for printing you use the Editing selection tool found in the Bottom Editing and
Timeline area and using the selection handles associated with the blue progress indicator, select a
portion of the video to print.
In the bottom part of the print dialog window you will see a number of printing options including
printer, paper type or size, orientation, Items (frames) per page, the number of copies and of course a
print preview of the current frame visible in Video Surgeon. Lastly there is a Fit picture to frame
option which will shrink or expand the picture to fit the size of the page (paper) selected. If you are
printing a zoomed image of the video, you MUST select this option.
Lastly, at the very bottom, next to the PRINT button there is a “Print to File” checkbox. If this
checkbox is selected Video Surgeon will output your selection – whether a single frame or a selection of
multiple frames – as png files and store them in the /Video Surgeon 2/Temp/ directory folder.
24
 The Sniffer Button – The sniffer module
in VS has been upgraded. You will note that when you click the Sniffer Button you have two options. One
is the Main Sniffer and the other is the YT Sniffer. Since most people use YT as their main video
sharing website, let’s start with this module.
The Sniffer Button – The sniffer module
in VS has been upgraded. You will note that when you click the Sniffer Button you have two options. One
is the Main Sniffer and the other is the YT Sniffer. Since most people use YT as their main video
sharing website, let’s start with this module.
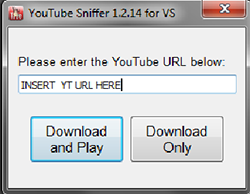
The YT Sniffer can be used ONLY on YouTube. It works slightly differently than the other sniffer. With
the YT sniffer you must copy and paste the YT URL into the form area of the sniffer. After you have
pasted the URL, click one of the buttons to download the file. Download and play means that the file
will be downloaded and then immediately open in VS.
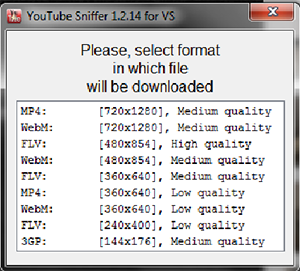 One of the reasons for upgrading and adding the
YT specific sniffer is that once you start the download, the sniffer will display for you all of the
video sizes and qualities available for a specific video.
One of the reasons for upgrading and adding the
YT specific sniffer is that once you start the download, the sniffer will display for you all of the
video sizes and qualities available for a specific video.
This allows you to pick the highest quality and or the largest size. This can be important because if
you intend to use the video zoom, this will allow you to maintain the highest possible quality as you
zoom in. As you can see in the nearby example this particular video has 9 choices. While not all videos
have this many sizes and qualities to choose from most videos have several.
The Main Sniffer should be used for all sites except Youtube. When you select the Main Sniffer option a
small window shown below will open. This window is referred to as the sniffer box because it is the
window in which the video linksug appear once they are "sniffed" or found by Video Surgeon. This window
is "always on top" so you can view the window as you are browsing the internet and looking at videos.
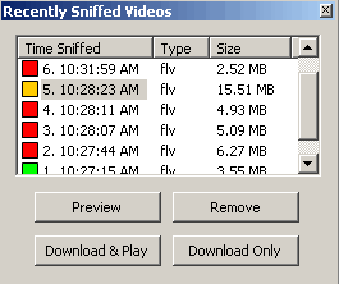
As you browse the internet and as a video starts
to play, Video Surgeon will detect the video playing, it will find the URL, and it will insert into the
sniffer window a summary of what it has found. The sniffer window displays a number which is the
chronological order in which a particular link was located. It also displays the time the link was
found, the file type, and the video size. In addition to this data, the sniffer window also contains
color coded boxes. These boxes tell you the status of a particular link in the sniffer box. The color
key is as follows. Red means the video has NOT been downloaded. Green means the video HAS been
downloaded. And Orange means the video is in the process of downloading.
There are four buttons on the sniffer window. The "Preview" button allows you to preview the video
before you download it. Since video URLs are loaded into the sniffer box as they are played in your
browser, in many cases you will know what link corresponds to a particular video and may not need to use
this function, especially if you have only 1 or 2 linksug in the sniffer window. However, as the number
of linksug in the sniffer box grows, you many need to use the "Preview" button to remind you of the
video associated with a link before choosing to download it. Please note, due to the way some videos are
created and coded on the internet this button will NOT always work, but it does allow you to preview
most videos.
The "Remove" button will remove or delete a link from the sniffer box.
There are two different types of download buttons. The "Download & Play" button, when clicked, will
open a Windows dialog box and prompt you to enter a name for the file you are downloading. Once you have
given the file a name, you will click the SAVE button on this windows dialog box, and Video Surgeon will
begin to download the video to your computer. Once the file download is complete, Video Surgeon will
begin the process of converting this file to a format used by the program that allows it to manipulate
the video. Once the conversion is complete, Video Surgeon will open the file in the main video window
and begin to play the video.
If you are only working with a single video that you want to download and begin to use immediately, this
download options would be ideal. However if you are surfing the WWW and looking for several or many
videos that you want to download as quickly as possible the "Download Only" button would be the
preferable choice.
The "Download Only" button, when clicked, invokes a Windows dialog box AND asks you to assign a
name to the file you are downloading. Once you have done this click the SAVE button on the windows
dialog box and Video Surgeon begins the process of downloading the video but it does not open the video
once the download is complete.
25
Editing – The editing functionalities
in Video Surgeon are located in the Edit Panel found in the left side controls. These are used in
combination with the selection toolfound in the Bottom Editing and Looping Area. In this Bottom Editing
area there is a triangular blue slider and a timeline. To the left and right of this slider are a green
and red handles. These handles are the selection tool. You grab these and drag them to the left and
right to select a specific section or segment of video. 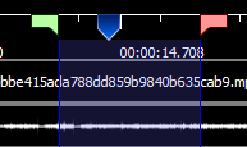 As
you drag these handles, a light blue shading will appear over top the timeline. (Note: You can instantly
remove a selection area and cause the red and green selection handles to nest behind the progress
indicator by double-clicking the blue progress indicator.)
As
you drag these handles, a light blue shading will appear over top the timeline. (Note: You can instantly
remove a selection area and cause the red and green selection handles to nest behind the progress
indicator by double-clicking the blue progress indicator.)
Once you have selected an area you can then execute any of the Editing commands found in the Editing
Panel of the left menu. These include Cut, Copy, Paste, Delete, Silence and Volume. A brief explanation
of each is provided below:
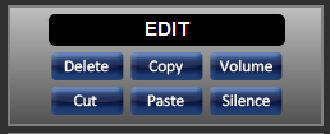
Cut – This command will remove the selected
area and place a copy of it on your clipboard.
Copy – This command copies the selected data to your clipboard
Paste– Inserts the A/V data on your clipboard into the currently open video
Delete – This command removes the selected data from the timeline
Silence – This command inserts silence in the selected area, or it can also be used to insert a
specified amount of silence at the beginning, end or at the current position.
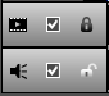
Synchronous or Asynchronous Editing – Video Surgeon allows you, thru the use of the lock icon at
the bottom left of the Bottom Editing area, to lock or unlock a channel. If both audio and video
channels are locked you cannot edit them. If both channels are unlocked then you will edit them both.
Lastly, if one or the other is locked and the other unlocked, you will edit only the one track and not
the other – this is called asynchronous editing.
 If you copy data while one channel is locked and
the other unlocked, only data from the unlocked channel will be copied. Consequently when you paste this
data, only the data from the unlocked channel is available to be pasted. This means that the locked
channel, whether audio of video, will be blank.
If you copy data while one channel is locked and
the other unlocked, only data from the unlocked channel will be copied. Consequently when you paste this
data, only the data from the unlocked channel is available to be pasted. This means that the locked
channel, whether audio of video, will be blank.
Most editing that you do will probably be within the same video. For example you might have a video that
you want to delete sections that are not of interest. However, it is possible for you to copy and paste
data BETWEEN different videos. For example, if you have a segment in several different videos that you’d
like to have one video, you can also copy and paste from one open window of Video Surgeon to another.
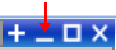
To open a second instance of Video Surgeon click the “+” symbol in the upper right hand corner of the
software. Once a second instance is opened, open a second video, and then you can copy and paste between
the two open Video Surgeon windows.
Editing changes that you make to a video can be saved permanently by Exporting the file and creating a
new video. Alternatively, you can save a video that you have edited as Video Surgeon Project file or
.vsp. If you save an edited video as a .vsp file, you need to be sure you do not change the file name or
location of the underlying video(s) used in the project file because a .vsp stores all of this
information and in the future when open recalls all of the necessary information. If changes are made to
this information, the .vsp file will not be able to correctly recreate the project.
26
Miscellaneous
Data Management – VS 2, like VS 1, must convert all files that are opened to an internal video
file format for its use. This means that you will have TWO copies of each video on your computer, the
original one and the converted one. Since video files are large files, if you use Video Surgeon a lot,
it will not take long before you are using a significant amount of disc space. To assist you in managing
this issue we have created an unused file clean up system within Video Surgeon. However before you
enable it, please make certain you understand how it works, so you don’t create problems for yourself.
The Options button contains a checkbox that says: “Clear Unused Files On Closing”. If you check
this box, VS will check all project files stored in the project folder path specified in the Options
button, and delete any unused converted files each time you close the program. It will not delete
ANY of the original video files.
PLEASE NOTE: If you select this option, it is imperative that all project files (.vsp files) be
stored in the designated path for project files found in the Options button (shown nearby.) If you
fail to store you project file this designated location, AND you have selected this option,
converted video files needed for your project files will be deleted and these project file will not
work when re-opened.
All converted video files are stored in the Cache subfolder of the Main Video Surgeon 2.0 folder found
on your machine. Any project files you create (.vsp) files will reference these converted video files.
Accordingly if you delete or rename these files, the project file you created will not work.
The Temp subfolder contains audio data that is extracted from video files and open which key and tempo
changes are applied. This data can be deleted without issues.
The Sniffer subfolder contains video files downloaded from the internet. These like, any other video
files on your computer are “original” files which VS converts before opening. Deleting these files or
any other raw video files on your computer that you have opened in VS, may or may not be something you
want to do. Once concern is that converted files may not be exactly the same quality as the original –
thought that is the objective when conversions are done. The second is that converted files, unless
associated through a saved Project File (.vsp) have very generic names and you may not be able to
relocate the file you are looking for without opening each video.
Video and Zoom Quality
As an axiom, garbage-in-garbage-out certainly applies to videos you open in Video Surgeon. If you start
with
a small frame size and/or poor quality video and open it in VS and then enlarge and zoom-in, the quality
will be poor. However, if you can find large frame size files such as 1280 x 720 or bigger that are in a
high quality format video format (mp4, flv, etc) then as you zoom in you will find they retain their
quality
much better.
Another measure of quality is the frames per second. The most common fps rates for video are between
25-30,
and, when viewed as a video these can be excellent quality. However, if you view the individual frames
of
these videos, which you can do in VS, you may very well see fuzziness or blurriness at the point of
activity. This is to be expected. There are two possible reasons. One is the ability of the person
filming
to hold the video camera perfectly still. The second, and probably more important one, is the high
degree of
movement of the object being filmed.
You may be familiar with the old rule of thumb in still photography that once you approach a shutter
speed
of 1/30th of a second of slower, you need a tripod otherwise the resulting picture will be blurry. In a
sense that is what is going on with your video camera, but it is further compounded if you are filming a
moving object. At a frame rate of 30 fps your camera is essentially shooting stills every 1/30th of a
second
- and then if the object being filmed has a lot of movement this further mitigates against a perfectly
in-focus, non-blurry frame. There are many video cameras that can shoot high definition videos with
frame
rates around 60 fps. This higher fps video will result in better quality especially if you are doing
frame
by frame analysis within Video Surgeon.
Three Machine License – Removing Licenses to add a new
machine
You purchase of Video Surgeon allows to have 3 machines activated at the same time – on the same
operating
system (windows). Once you have used up all three slots you will not be able to activate Video Surgeon
on
other machines. If you wish to remove VS from one machine so you can free a slot to activate it on
another
machines, you would go to Help >> Deactivate machine. Once you have executed this function, you
will
be transferred to the Account Page on our website, where you will need to log in and then remove the old
machine from the list of active machines.
Activating Machines
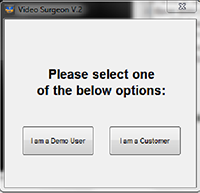
When you first open Video Surgeon, you will see a dialog window with two options as shown to the right.
Select the option that says: I am a Customer and then provide the requested information. Our
system
will confirm you are a customer and then send a license to your machine. This MUST be done while
connected to the internet.
For additional information and assistance with learning how to run your copy of Video Surgeon, please go
to
the video tutorial page of our website where you will find screen videos which show you how to use all
major
functions found in Video Surgeon.
27
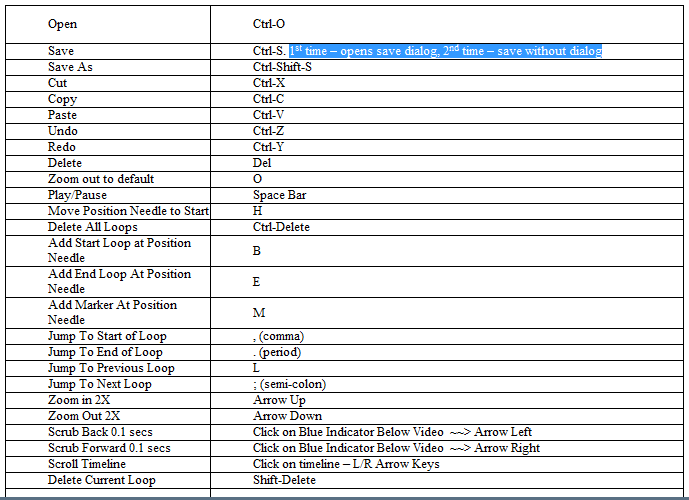
Keyboard Shortcuts
The following is a list of keyboard shortcuts which are available for use on Video Surgeon. These
shortcuts replicate functions that you can execute with your mouse using the main interface.